

In this blog post I will provide a step-by-step guide on how to interact with OpenBanking APIs, explaining things along the way.
In the previous article we went over the key motivations, concepts and interactions in the PSD2/OpenBanking ecosystem. If you have not done so already, take a few minutes to read it. It explains in depth a number of concepts I touch upon below.
Going into the technical details of things, in this post I will cover
- how to connect to and setup a realistic OpenBanking sandbox,
- how to make API calls using cURL,
- explaining the why and how along the way.
An OpenBanking sandbox
Since calling live OpenBanking APIs is reserved for licensed TPPs, we will need to use a sandbox.
I will be using the RBS Group developer portal, specifically the RBS branded sandbox. 1
I will also refer to v.3.1.0 of the OpenBanking APIs throughout this article. That is the latest version supported by
the sandbox as of writing this.
Registration to the sandbox is straight-forward, requiring a valid e-mail for verification.
Before I proceed to the interesting bit (calling the APIS), I need to take a few moments and explain some…
Basic sandbox concepts
Teams
A Team is an isolated wrapper for
- a set of virtual bank customers,
- with their one or more bank accounts,
- their login credentials, and
- their transactions,
- between them,
- to/from anyone,
- in the past or in the future.
In other words, a Team is a mini-bank.
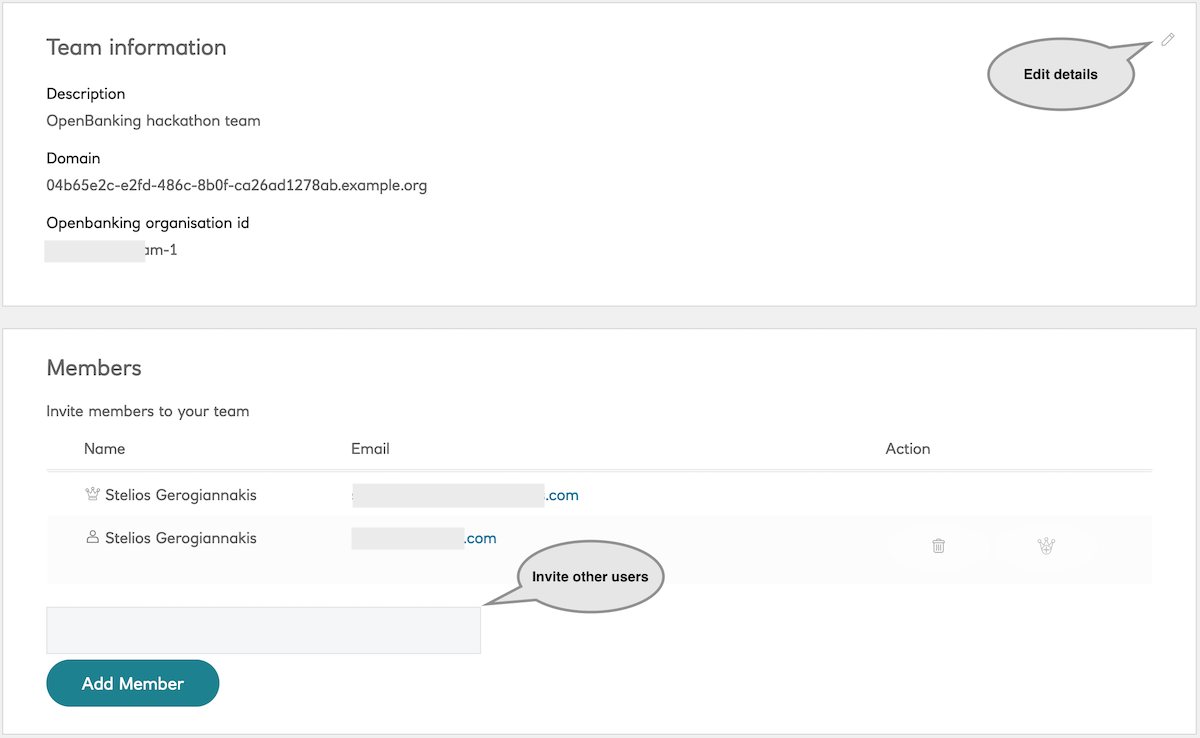
The reason it is called a Team is because you can invite other sandbox portal users to collaborate on the data.
You invite another user by specifying their e-mail. They must have logged in at least once.
Data in a Team (i.e. Transactions and, by consequence, Balances) can be altered by API calls (namely, using the Payments API). The eBanking interface (see next sections) is read-only and can be used to spot-check the results.
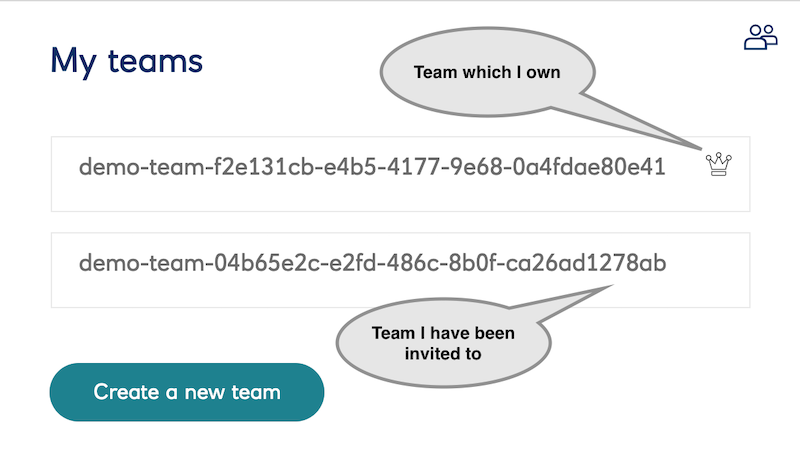
Teams in the dashboard
Team details
The “Team Information” values will be used when making API calls.
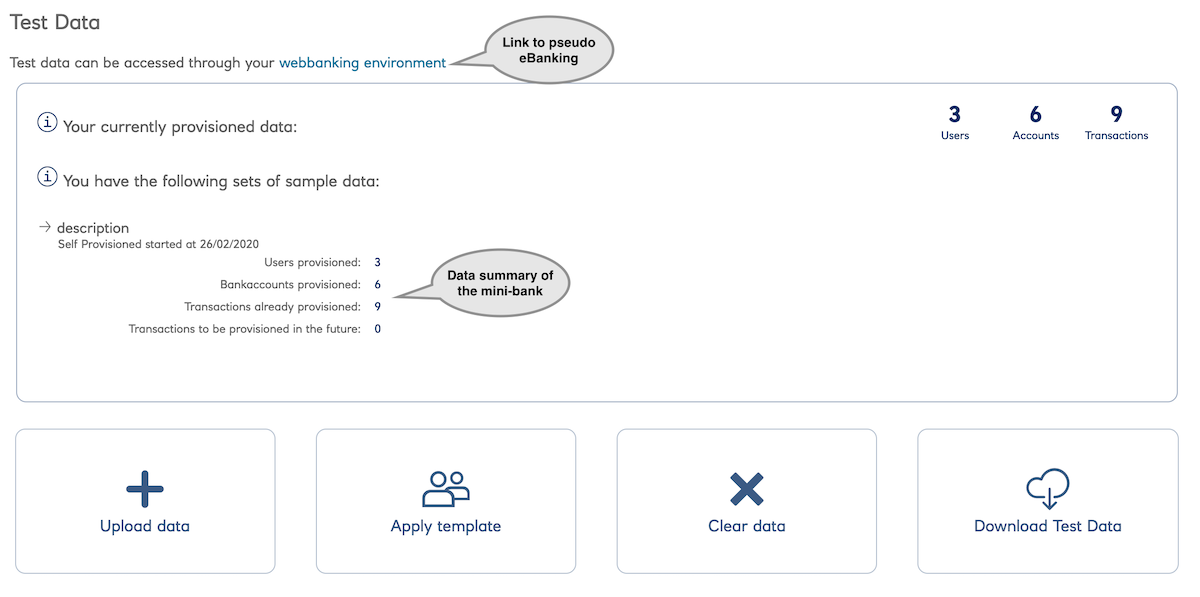
Team data
A Team comes pre-provisioned with some sample data.
The Team data is a mix of
- RBS-specific concepts and
- mapping the OpenBanking data spec to YAML.
Customers
There are 3 types of customers, each one corresponding to an RBS bank “franchise“.
- Private
A retail banking customer, with personal bank accounts only.
Uniquely identified by a customerNumber (10 digits) and/or a cardNumber (16 digits). - Business
A business banking customer.
They belong to a company (customerId) and are identified by theiruserId.
In real life the company is the actual owner of the account(s), with the users being the company’s employees. - Cards Online
A business banking customer, given a corporate card. They are identified by ausername.
All Customers authenticate themselves by a few random digits of their password (6+ alphanumeric characters ) and their
pin (4+ digits). This is called partial-pin-partial-password or 4P.
All of the auto-created customers, when creating a new Team, have as default credentials:
- password: 1234567890
- pin: 12345678
When uploading new customers in bulk, you have to explicitly define their credentials.
Transactions & data
This section is a reference of all the possible values you can use when creating custom YAML data (see next section).
Click to expand!
The fields to define in the YAML for each data type are defined in the OpenBanking response payloads of their corresponding endpoints.
- Account details: Accounts v3.1
- Beneficiaries: Beneficiaries v3.1
- Direct Debits: Direct Debits v3.1
- Standing Orders: Standing Orders v3.1
- Scheduled Payments: Scheduled Payments v3.1
- Transactions: Transactions v3.1
- Enumerations: Namespaced Enumerations - v3.1
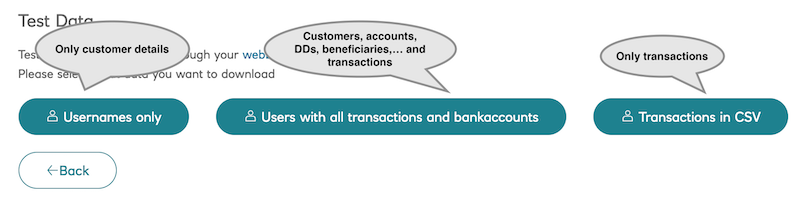
You can download the auto-generated data to get a first idea of the format.
Creating data
Team data is described in a YAML file.
The data can be structured in one of 3 ways.
Static
Describe all users, with their accounts, beneficiaries, direct debits,…etc as a static snapshot.
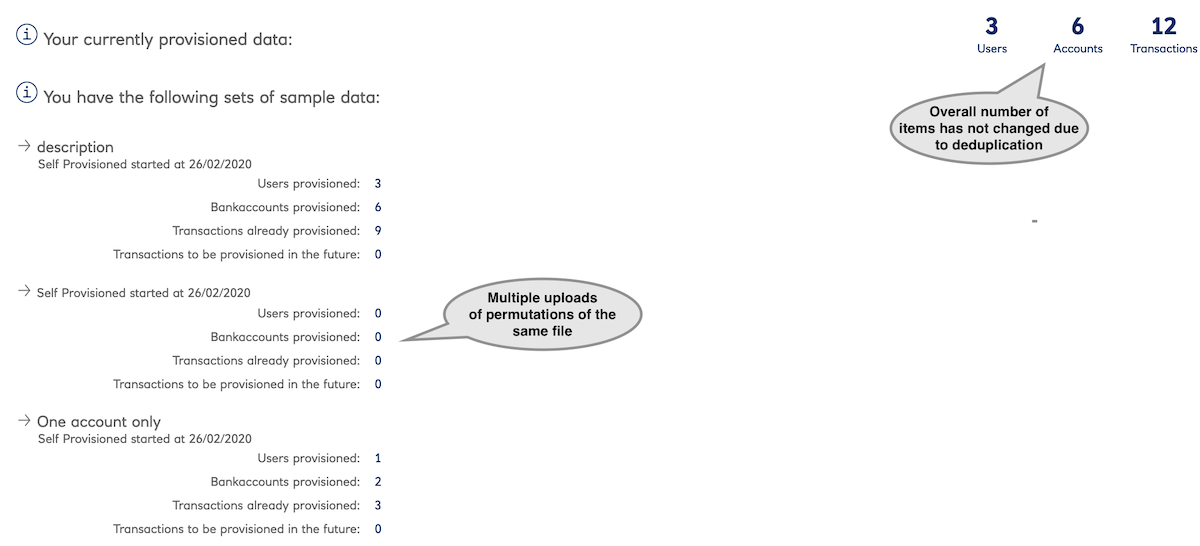
Each uploaded YAML file incrementally adds to the data store. Existing users have their transactions deduplicated (i.e.
one cannot add the same transaction twice).
This capability allows for
- breaking up of complex scenarios in multiple files, and
- testing in a cycle of (setup data) → API call → (assert result) → (update data) → API call → (assert result)
Dashboard after multiple data uploads.
Dynamic
This is an auto-provision of values (users, transactions,…) based on some statistical parameters.
Once uploaded, the auto-created users can be downloaded separately in order to drive an integration test suite, login to eBanking etc.
Details on this can be found here.
Hybrid
A static data file can be prepended with some roll-forward parameters.
This allows for “by example” scenarios of a known past baseline and semi-random future data items.
Details on this can be found here.
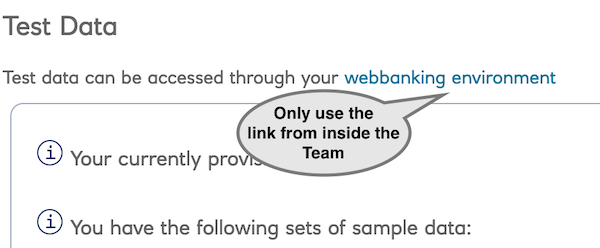
eBanking
The sandbox provides a pseudo-eBanking environment from where to verify the results of API calls.
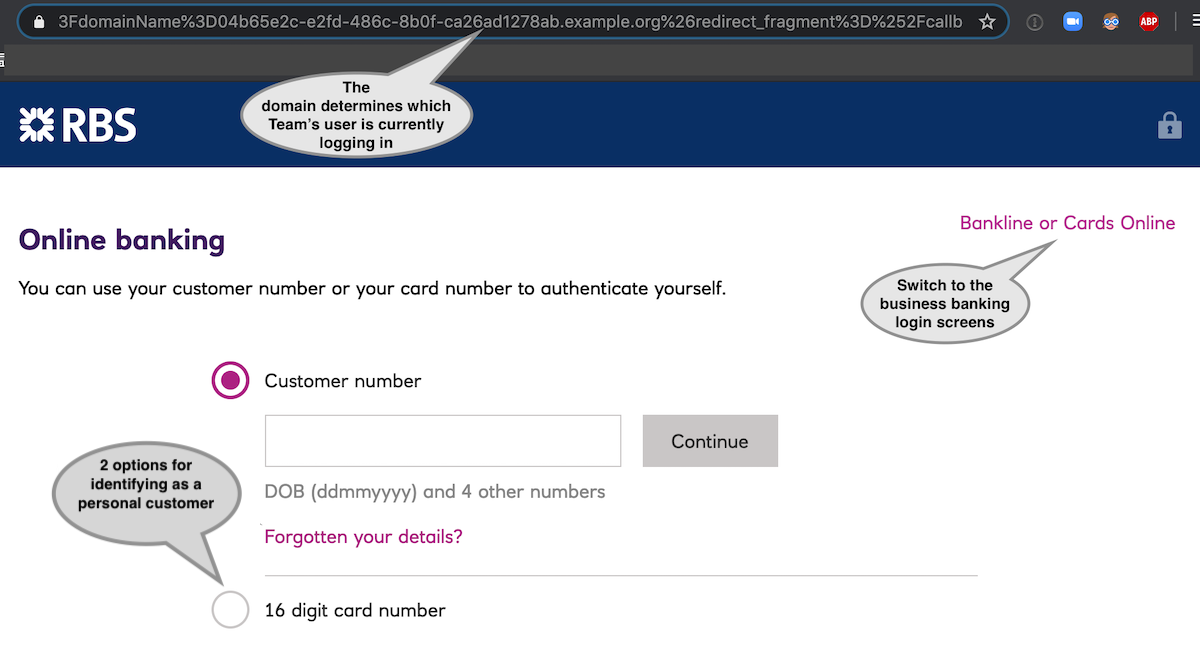
Login
Accounts
After login, you can view all the accounts defined in the Team data.
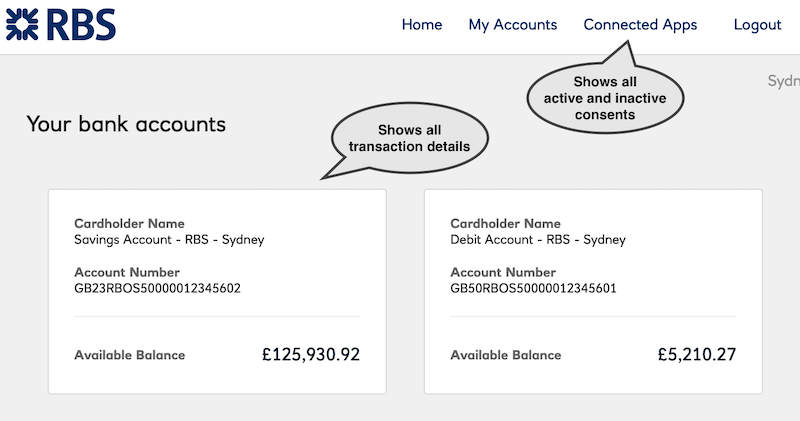
Consents
You can also view all the Consents given to Applications.

Revoking a consent allows you to test the API’s (and Application’s) behaviour, when the access token becomes invalid.
Applications
An Application is a “licensed” TPP with access to the Teams’ data.
For this reason, an Application is associated with a single Team.
From a code point-of-view an Application is just a set of credentials to access a bank.
The same code deployment (i.e. running process) can have an array of Application credentials and connect to many
different banks.
Activation
An Application needs to be explicitly enabled for a specific API.
This is to “emulate”
- the difference between AISP and PISP licensing at OpenBanking level, and
- the need for a TPP to explicitly register with the bank before calling any API.
Security
There are 3 levels of configurable security.
App identification
The OpenBanking security profile is based on the FAPI-RW and OpenID Connect specifications.
What this means in plain English is that the client is identified by 2 key-pairs:
- Transport layer: All calls are over MA-TLS, using their QWAC
- Application layer: The client is using their QSEAL to sign JWTs and the bank verifies them with the public key.
The sandbox gives the option for
- OpenBanking-like transport layer security (MA-TLS), or
- A simple client id and secret, as is common with most APIs.
Request authorisation During the OpenBanking OAuth flow to request an access token, the Application must send a signed JWT in order to identify itself (therefore proving ownership of the QSEAL).
The sandbox gives the option for
- OpenBanking-like application layer security (signed JWT), or
- plain-text requestId
User consent flow
The Application is expected to be browser- or mobile-based and support a redirection to the bank’s consent authorisation screens.
In the sandbox, this means a redirection to the eBanking login screens, typing the 4P credentials and clicking “Authorise“
on the consent.
The sandbox gives the option for
- an OpenBanking-like UI-based flow, or
- a non-standard API call to emulate the user granting consent (programmatically authorise).
Let’s get started

Photo by Nadya Spetnitskaya on Unsplash
Let’s get our hands dirty by performing a…
First test with cURL
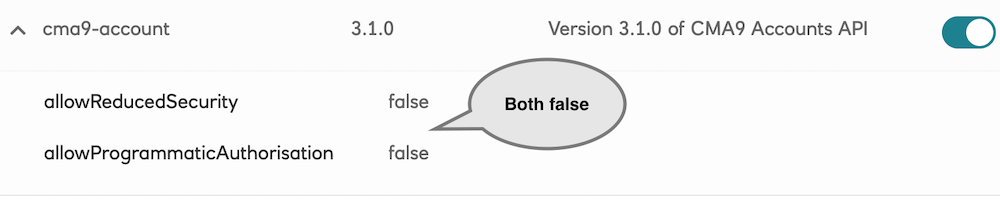
In the first test we will follow the steps to invoke the 3.1.0 Accounts API, with reduced security and programmatic consent approval.
Reduced security
As we mentioned above, the OpenBanking security profile requires the TPP to secure the calls at both the Transport and Application layers. For this reason, the TPP would normally need to
- make a call over MA-TLS, and
- when sending the consent approval request (e.g. slide 17, step 1), the request parameter needs to be a signed JWT.
The sandbox gives the ability to call the APIs using a “lesser” security profile, namely a client id and secret.
Note: A client_id/secret would be the way a “normal” API would be secured. This is the security level that OB aggregators like Yapily and TrueLayer have also chosen.
It is important to highlight that the OpenBanking APIs’ security is above that of a normal API.
Programmatic approval
In the same consent approval flow, the bank responds with a redirection URL. The TPP’s application is expected to
guide the customer to the bank’s authentication and authorization screens behind this URL (e.g. slide 17, steps 2-3).
When testing, this would need to be copied to a browser and continue manually.
In the sandbox, the authentication and authorization screens can be short-circuited with some non-standard API arguments.
This will emulate as if the customer gave their consent (or not).
Configuration
In terms of configuration, your application should look like this
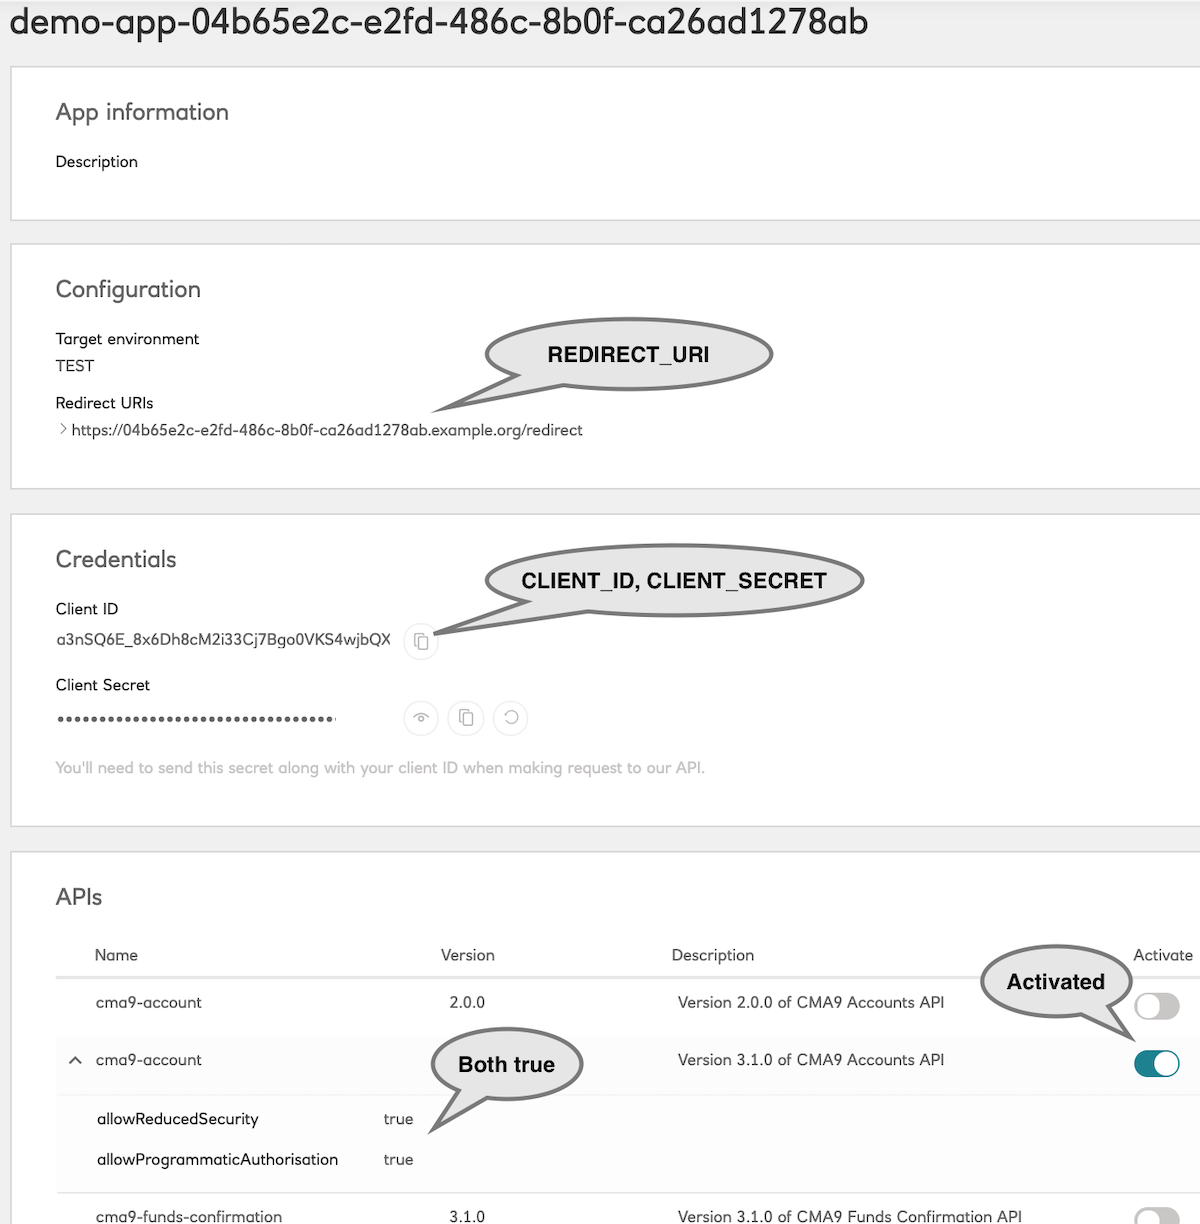
Sandbox Customer ids are a combination of
- the id given in the dataset
- plus the unique “domain” auto-generated for the Application
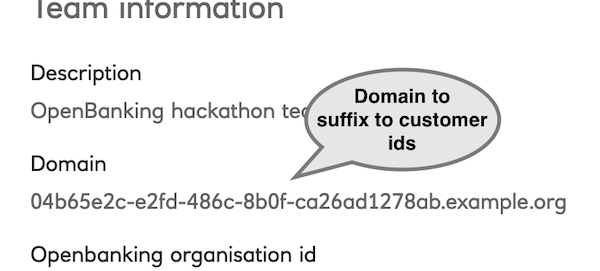
Instructions on how to construct a valid sandbox customer id can be found here.
All OpenID Connect authorization servers are required to provide a discovery endpoint.
This enumerates the server’s capabilities and allows clients to auto-configure themselves prior to making any calls.
The sandbox’s discovery endpoint is here and returns something like the following image
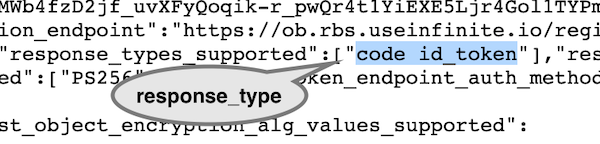
The highlighted value is the one supported by RBS for the consent authorisation request.
Execution
You can copy-paste the cURL commands below replacing the placeholders (in uppercase).
Get an application access token
1
2
3
4
curl -k -X POST \
  https://ob.rbs.useinfinite.io/token \
  -H 'Content-Type: application/x-www-form-urlencoded' \
  -d 'grant_type=client_credentials&client_id=CLIENT_ID=&client_secret=CLIENT_SECRET=&scope=accounts'
This will return an access token (APP_ACCESS_TOKEN).
Create a consent
This will create a consent to view a Customer’s account information.
See the specific Permissions requested.
1
2
3
4
5
6
7
8
9
10
11
12
13
14
15
16
17
curl -k -X POST \
  https://ob.rbs.useinfinite.io/open-banking/v3.1/aisp/account-access-consents \
  -H 'Authorization: Bearer APP_ACCESS_TOKEN' \
  -H 'Content-Type: application/json' \
  -H 'x-fapi-financial-id: 0015800000jfwB4AAI' \
  -d '{
  "Data": {
    "Permissions": [
      "ReadAccountsDetail",
      "ReadBalances",
      "ReadTransactionsCredits",
      "ReadTransactionsDebits",
      "ReadTransactionsDetail"
    ]
  },
  "Risk": {}
}'
This will return the created CONSENT_ID, awaiting approval by the Customer.
Programmatic approval
As we said, we will go ahead and pretend a Customer logged in and approved the Consent request. (see authorization_result).
1
2
3
4
5
6
7
8
9
10
curl --location -X GET -G -k "https://api.rbs.useinfinite.io/authorize" \
   --data-urlencode "client_id=CLIENT_ID" \
   --data-urlencode "response_type=code id_token" \
   --data-urlencode "scope=openid accounts" \
   --data-urlencode "redirect_uri=REDIRECT_URI" \
   --data-urlencode "request=CONSENT_ID" \
   --data-urlencode "authorization_mode=AUTO_POSTMAN" \
   --data-urlencode "authorization_result=APPROVED" \
   --data-urlencode "authorization_username=CUSTOMER_ID@DOMAIN" \
   --data-urlencode "authorization_accounts=*"
 This returns the AUTHORIZATION_CODE.
Get a resource access token
We can use the authorization code as proof of user acceptance. With it, we can now get an access token to start calling
API endpoints.
1
2
3
4
curl -k -X POST \
  https://ob.rbs.useinfinite.io/token \
  -H 'Content-Type: application/x-www-form-urlencoded' \
  -d 'client_id=CLIENT_ID&client_secret=CLIENT_SECRET&redirect_uri=REDIRECT_URI&grant_type=authorization_code&code=AUTHORIZATION_CODE'
This returns the RESOURCE_ACCESS_TOKEN.
Get some actual results
We can now call any of the Account APIs endpoints. For example
1
2
3
4
curl -k -X GET \
  https://ob.rbs.useinfinite.io/open-banking/v3.1/aisp/accounts \
  -H 'Authorization: Bearer RESOURCE_ACCESS_TOKEN' \
  -H 'x-fapi-financial-id: 0015800000jfwB4AAI'
Full-on security flow
After seeing a quick-and-dirty example, let’s see something more realistic.
The steps below are the closest you can get to calling a live OpenBanking API directly.
Certificates
In the real world, we would need to
- create 2 key pairs for the QWAC and QSEAL
- send the CSRs to a QTSP to get the certificates (or get them from OBIE, if a UK-based TPP)
etc
Here we will take a shortcut and
- auto-generate a self-signed certificate, and
- re-use it both as QWAC and QSEAL.
The Bash script in the expanding box below automates the generation of the key pair and certificate.
Click to expand!
1
2
3
4
5
6
7
8
9
10
11
12
13
14
15
16
17
18
19
20
21
22
23
#!/bin/bash

echo "Please provide your certificate's domain name, e.g. xyz.foobar.com"
read -p "Domain: " DOMAIN

echo "--- Generating... ---"

openssl genrsa -des3 -passout pass:x -out ./client.pass.key 4096
openssl rsa -passin pass:x -in ./client.pass.key -out ./client.key
rm ./client.pass.key
openssl req -new -key ./client.key -out ./client.csr \
  -subj "/C=GB/ST=London/L=London/O=FooBar/OU=Payments Group/CN=$DOMAIN"
openssl x509 -req -sha256 -days 365 -in ./client.csr -signkey ./client.key -out ./client.crt
openssl x509 -in ./client.crt -out ./client.pem

echo "--- Files created: ---"
ls client.*

echo "--- Copy the certificate below to the sandbox ---"
cat client.pem

echo "--- Use the key below to sign the JWT in jwt.io ---"
cat client.key
Application
You will need to create a new Application in the sandbox with MA-TLS enabled.
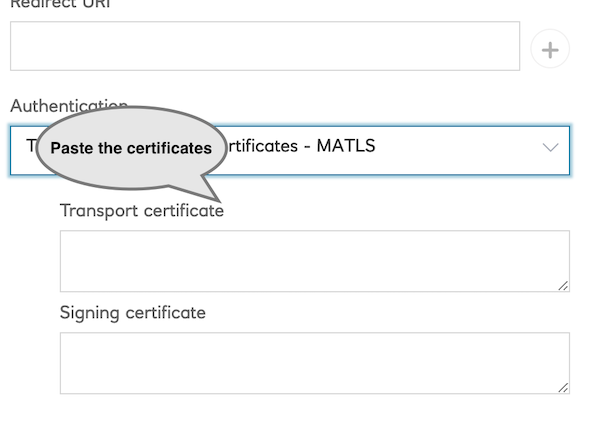
APIs
Disable the API security “shortcuts“ for the new Application.
Sandbox secure client authentication
Just to re-iterate, the sandbox OIDC Configuration endpoint specifies the supported way of identifying a secure
client. In our case, we know this is MA-TLS.

All supported ways are enumerated in the OpenBanking OIDC Security Profile, section 5.2.2, item 7.
Supported customer authentication
When banking customers authenticate themselves, the banks may specify their own options. This is again exposed
in the sandbox OIDC Configuration endpoint.

All possible values are enumerated in OpenBanking OIDC Security Profile, parameter request.
Supported JWT signing algorithms
 Each bank (and the sandbox) may support different algorithms signing the
 request JWT.
The possible values are defined in the JSON Web Algorithms specification.
Execution
Get client access token
1
2
3
4
5
6
7
curl -k \
  --key ./client.key \
  --cert ./client.pem \
  -X POST \
  https://ob.rbs.useinfinite.io/token \
  -H 'Content-Type: application/x-www-form-urlencoded' \
  -d 'grant_type=client_credentials&client_id=SECURE_CLIENT_ID=&scope=accounts'
Copy the CLIENT_ACCESS_TOKEN.
Create a consent
1
2
3
4
5
6
7
8
9
10
11
12
13
14
15
16
17
18
19
20
curl -k \
  --key ./client.key \
  --cert ./client.pem \
  -X POST \
  https://ob.rbs.useinfinite.io/open-banking/v3.1/aisp/account-access-consents \
  -H 'Authorization: Bearer CLIENT_ACCESS_TOKEN' \
  -H 'Content-Type: application/json' \
  -H 'x-fapi-financial-id: 0015800000jfwB4AAI' \
  -d '{
  "Data": {
    "Permissions": [
      "ReadAccountsDetail",
      "ReadBalances",
      "ReadTransactionsCredits",
      "ReadTransactionsDebits",
      "ReadTransactionsDetail"
    ]
  },
  "Risk": {}
}'
Copy the CONSENT_ID.
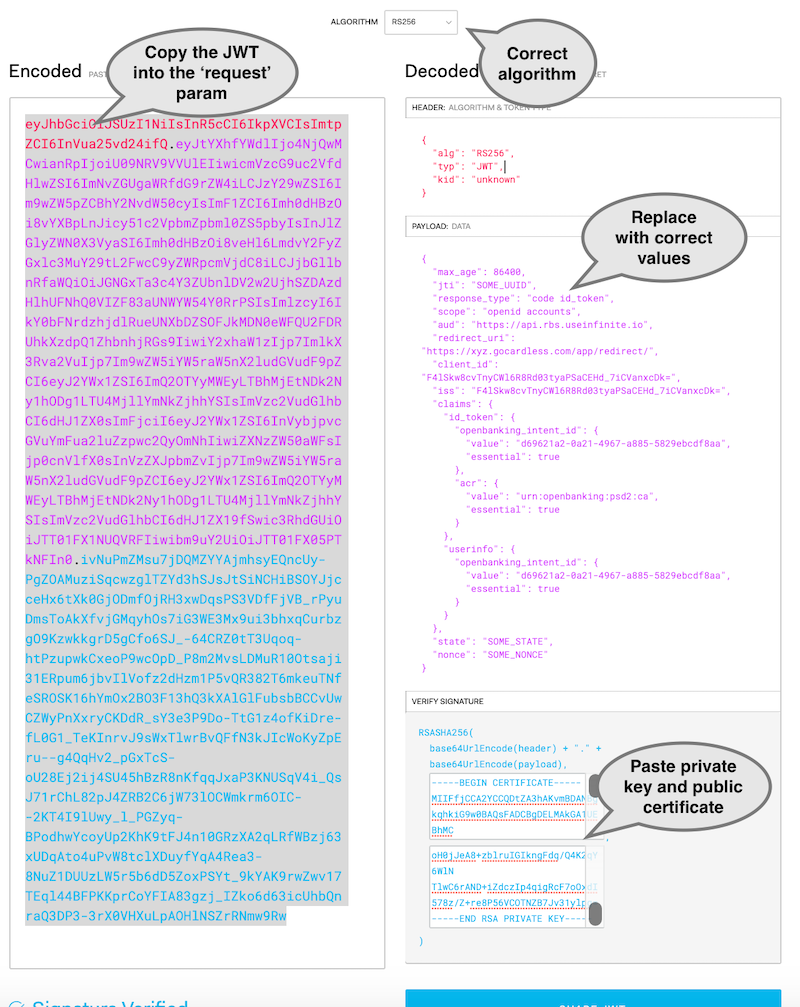
Create the ‘request’ JWT
At this step you are initiating the consent flow.
For this you will need to assemble and sign a JWT. Use the template in the expandable box below.
Click to expand!
1
2
3
4
5
6
7
8
9
10
11
12
13
14
15
16
17
18
19
20
21
22
23
24
25
26
27
28
29
30
31
32
33
34
35
36
37
38
--- Header ---
{
  "alg": "RS256",
  "typ": "JWT",
  "kid": "unknown"
}

--- Payload ---
{
  "max_age": 86400,
  "jti": "SOME_ANTI_REPLAY_UUID",
  "response_type": "code id_token",
  "scope": "openid accounts",
  "aud": "https://api.rbs.useinfinite.io",
  "redirect_uri": "REDIRECT_URI",
  "client_id": "CLIENT_ID",
  "iss": "CLIENT_ID",
  "claims": {
    "id_token": {
      "openbanking_intent_id": {
        "value": "CONSENT_ID",
        "essential": true
      },
      "acr": {
        "value": "urn:openbanking:psd2:ca",
        "essential": true
      }
    },
    "userinfo": {
      "openbanking_intent_id": {
        "value": "CONSENT_ID",
        "essential": true
      }
    }
  },
  "state": "SOME_STATE",
  "nonce": "SOME_NONCE"
}
"kid": "unknown" is a sandbox “magic” value, since there is no external JWKS endpoint to read the public key from.
The placeholders named SOME_XYZ are application-specific, for additional security.
You can specify a value of your choosing or leave them as-is.
Copy-paste the above template and assemble your final JWT in the online helper at jwt.io.
Get the consent URL
1
2
3
4
5
6
7
8
9
curl -v -G -k \
  --key ./client.key \
  --cert ./client.pem \
  "https://api.rbs.useinfinite.io/authorize" \
   --data-urlencode "client_id=CLIENT_ID" \
   --data-urlencode "response_type=code id_token" \
   --data-urlencode "scope=openid accounts" \
   --data-urlencode "redirect_uri=REDIRECT_URI" \
   --data-urlencode "request=SIGNED_JWT"
Copy the consent redirection URL in the response.

Paste the URL in a browser and complete the consent authorisation.
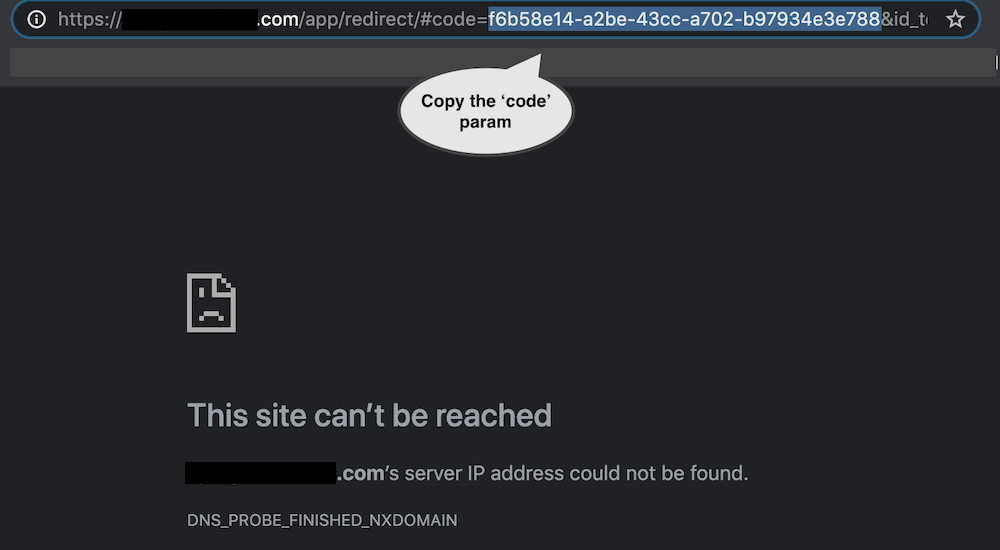
After the successful consent approval the browser will be redirected back to your REDIRECT_URI (the site of which
probably does not exist). What we are interested in, is the code URL parameter.
Exchange code for access token
1
2
3
4
5
6
7
curl -v -G -k \
  --key ./client.key \
  --cert ./client.pem \
  -X POST \
  https://ob.rbs.useinfinite.io/token \
  -H 'Content-Type: application/x-www-form-urlencoded' \
  -d 'client_id=CLIENT_ID&redirect_uri=REDIRECT_URI&grant_type=authorization_code&code=AUTH_CODE_FROM_URL'
Call an API endpoint
1
2
3
4
5
6
curl -v -G -k \
  --key ./client.key \
  --cert ./client.pem \
  https://ob.rbs.useinfinite.io/open-banking/v3.1/aisp/accounts \
  -H 'Authorization: Bearer ACCESS_TOKEN' \
  -H 'x-fapi-financial-id: 0015800000jfwB4AAI'
TA-DAAAA! Well done!
You are now fully versed in OpenBanking!
Parting thought

Photo by Brendan Church on Unsplash
In these 2 articles (part 1) we went from the original motivation and high level concepts of the OpenBanking and PSD2 APIs to a detailed hands-on walkthrough of interacting with an API.
The OpenBanking APIs emerged in the aftermath of the 2007-2008 financial crisis as an attempt to open up access to
the retail banking sector and the underlying payments infrastructure.
Just over 10 years later and we are witnessing a much-much larger debt and, eventually, currency crisis.
There are many arguments on what should be done and what will eventually happen, but one thing seems inevitable: currencies
becoming digital-only.
There are 2 primary avenues that lead in that end state.
- Crypto-currencies, i.e. digital wallets utilizing public-private cryptography
- API- and message-based access to the payment infrastructure.
OpenBanking/PSD2 falls in this category, with India’s UPI being a prominent, large-scale example.
These avenues are not mutually exclusive; government crypto-currencies could be kept at the settlement/infrastructure layer. You can find a high-level description of the different future payment networks in my relevant blog post (full series: parts 1, 2 and 3)
In either case, the OpenBanking and PSD2 framework has a very high probability of becoming the de facto interface to the domestic and international payments infrastructure.
Hopefully these two blog posts made this space a little bit less obscure.
Footnotes