
Ensuring that stablecoins are fully backed in a transparent way is crucial for trust. This article presents an automated approach based on OpenBanking.
Stablecoins and why we need them
Stablecoins are central to the crypto ecosystem as a high velocity medium of exchange and unit of account.
Let’s take a deep dive on What stablecoins are and then examine Why we need them.
Types of stablecoins - The What
As their name suggests, stablecoins offer stability of exchange value against another asset or currency. E.g. 1
coin X = 1 USD.
This stability can be achieved in a number of ways, which give us 4 different categories (original analysis
can be found here).
- “True” Stablecoins
These are non-interest bearing coins. Stability is achieved by the issuer through 2 pillars. Namely, the issuer- Mints and buys back coins at par, and
- Holds assets to back their redeem obligation. To avoid currency risk, the assets need to be denominated in the
reference currency, be highly liquid, and considered “safe”. A classic example is government bonds, like US Treasuries.
These assets must be held separately to protect coin holders in case of bankruptcy.
- Deposit Stablecoins
These tokens are claims against deposits held in commercial banks. Holders are protected by the legal framework governing bank deposits (e.g. capital requirements, deposit insurance,…). In other words, deposit coins are a new layer on top of the current system of banking and payments. Without a clear legal framework, coins issued by one bank, might not be recognised by others. - Decentralised Stablecoins Backed By Crypto
These tokens do not have a central operator; they are governed by a consensus of the users who take part in the network. Coins in circulation are backed by crypto-assets in a mechanism of overcollateralisation and forced liquidations (e.g DAI is backed by a crypto-basket). - Decentralised Algorithmic Stablecoins
These coins do not have any external collateral backing their system; they rely on algorithms and market incentives to
remain stable against a fiat currency. Though elegant in theory, it is questionable how their underlying primitives and assumptions will work in extreme conditions. This was highlighted in a spectacular way by the Terra UST collapse.
Use of stablecoins - The Why
If you have not yet read my 3-part series on how global payments work (part 1, part 2, part 3), you are really missing out! Go ahead and read them, I’ll wait… 😎
If you have, then you already know that the world of international fiat payments is underpinned by a network of nostro-vostro accounts with slow, multi-day settlement cycles. In the 24/7/365 world of real-time blockchain settlement, this will just not cut it.
Stablecoins are a blockchain-native unit of account and medium of exchange. It massively accelerates the velocity of fiat money to match the velocity of other blockchain digital assets.
Intro to OpenBanking
Put in very simple terms, OpenBanking is a financial and technical standard.
It allows a bank customer to
- securely authorise third parties,
- through an API
- to perform all activities said customer would have to logon to the bank’s portal to perform.
I have covered the internals of OpenBanking in great detail in my 2-part series (part 1, part 2).
Take some time to go through them, as we will be using some key concepts in our solution.
Marrying OpenBanking & web3

Photo by Foto Pettine on Unsplash
Like any system and product, we need to start with a…
Problem
The current stablecoin market is dominated by a few big players, namely USDT, USDC and BUSD. All three of them belong to the true stablecoin category above1. Namely
- On-ramp only for large investors (e.g. $100k deposit minimum for USDT)
- Off-ramp for accredited people (sometimes discretionary)
Most importantly and to this day, the lack of transparency in the whole minting and redemption process is a constant source of FUD.
An ideal solution would
- automate away the need for manual processing of fiat payments, minting and redemption of tokens, and
- be making all interactions visible and provable on-chain. This would make the process of externally validating the protocol’s volumes trivial.
Challenges
OpenBanking is built on top of OAuth2, inheriting a fundamental assumption: an end-to-end secure channel, namely HTTPS.
This is crucial as the OpenBanking messages carry sensitive information2.
This comes at a stark contrast with blockchains, where transparency of information underpins trust.
We will need to consider how to use available cryptographic primitives to address this challenge.
Solution
The following diagram gives an overview of our protocol’s functionality.
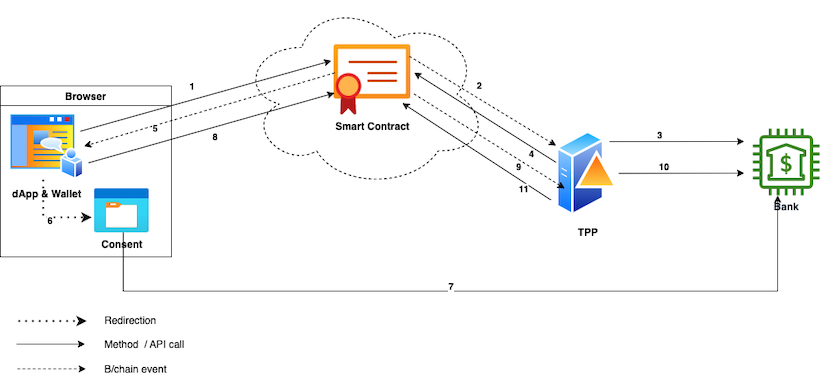
The minting flow of our OpenBanking dApp
The smart contract has one or more “owners”, which are OpenBanking regulated TPPs. The TPP(s) publish their encryption key in the contract. See a detailed encryption discussion in the next section.
- The Payer launches the minting dApp and makes a
mintRequestmethod call to the smart contact.
The requested fiatamountis visible on-chain, while the following payload is encrypted with the TPP’s public key.1 2 3 4 5 6 7
{ "institutionId": "Payer's bank", "sortCode": "UK branch identifier", "accountNumber": "Self explanatory", "name": "Account holder name", "publicKey": "Payer's public encryption key" }
- The contract emits a
MintRequestevent.
The TPP use their private key to decrypt the payload, and… - Create an initial payment consent calling the payer’s bank OpenBanking API.
The bank responds with an authorisation URL, for the Payer to approve. - The TPP makes an
authRequestmethod call to the contract.
The payload is encrypted with the Payer’s public key (from the previous message) and looks like this1 2 3 4
{ "url": "Auth'n URL for the Payer", "consentId": "Bank-generated identifier for this consent" }
- The smart contract emits an
AuthRequestevent and the Payer’s dApp decrypts it with its private key. - The dApp redirects the Payer to the consent authorisation screen using the URL, and…
- The Payer authorises the payment, getting back a unique authorisation code.
- The dApp encrypts the code with the TPP’s public key and makes an
authGrantedsmart contract call. The payload looks like this1 2 3 4
{ "consentCode": "Authorisation code", "requestId": "Original mint request id, to associate this call" }
- The TPP receives the
AuthGrantedevent, decrypts the payload and… - Uses it to contact the bank and execute the payment. Once the payment is confirmed settled by the bank (by polling or callback), then…
- Call the smart contract’s
paymentCompletemethod, doing the token mint and crediting the Payer’s address with the right amount of new tokens (minus fees).
Encryption discussion
Client-side wallets are all about isolating and protecting user private keys. These are not exposed in any way but rather
hidden behind abstraction methods.
The Metamask wallet supports asymmetric encryption/decryption, by exposing eth_decrypt and
eth_getEncryptionPublicKey3.
Digging a bit deeper in the code, we see that Metamask is using the eth-sig-util library for all its cryptographic actions.
We can also see that the Metamask team has not re-invented the wheel, but rather chose to implement the NaCl secret
key algorithm.
That is great, as we can find good, compatible NaCl implementations in all the major languages. More on this below.
The last thing to consider are the details of the interaction.
The Payer has no way of knowing the TPP’s public encryption key upfront4, so the TPP needs to
publish it somewhere. In this instance, we will choose a read-only field of the smart contract.
In an industry-grade setup, the TPP would regularly rotate their encryption key and keep the private part in an HSM.
We also need a way to inform the TPP of the Payer’s encryption key.
To avoid leaking information on-chain, we choose to encrypt it as part of the payload. In a more robust setup, the Payer’s dApp
could choose to generate session-level encryption keypairs. The downside would be that old TPP messages cannot be retroactively
decrypted once the session key is discarded.
Let’s get coding

Photo by James Harrison on Unsplash
The code for this blog post is in repository hello-stablecoin.
Each section below has a corresponding code branch (v1,v2etc) containing the progress of the project until that point. You can switch to that branch and follow along at your pace.
v1 - Setup and smart contract minting
We are going to have all our code in a single repo.
Everything related to the smart contract will be in sub-folder /chain.
We start by installing the correct Node version and an initial Typescript Hardhat project skeleton by scavenging
from our previous Hardhat project.
You can install all dependencies by running
1
2
3
4
cd chain
nvm install 18.7.0
nvm use 18.7.0
npm install
We created the outline of our smart contract using OpenZeppelin’s wizard.
Namely, our contract is
- a fungible token (ERC-20)
- mintable & burnable (the whole point of this exercise!)
- pausable (in case of an emergency), and
- ownable (as only the TPP should be able to call certain lifecycle methods)
Our additions to the contract are
- Disable the public
mintmethod; we want this to happen via the lifecycle, not explicitly. - Expose the TPP’s public key for clients to use for encryption.
- Create a map of mint commitments. This will help the contract keep track and reduce spam as much as possible.
- Define the payload of the different events that the contract will emit. Notice that we have made some fields
indexedto aid with event retrieval on the client side. - Define the logic and controls of the 4 smart contract methods:
mintRequest,authRequest,authGranted,paymentComplete.
We can now compile out contract to check for errors: make compile-contract
v2 - Contract unit tests
It’s time to do some unit testing of our contract.
Our tests at this stage provide some basic coverage and are split in 3 groups
- basic functionality, like contract name and pausing
- end-to-end logical flow (testing method and events payload)
- encryption/decryption, simulating the behaviour of the user’s wallet and TPP’s process
We can run the test suite with make test-contract.
These unit tests serve as an initial example of using ether.js and Hardhat’s embedded chain runner to test smart contracts.
However they are far from providing a complete coverage of functionality.
The reader can easily extend them as an exercise to cover additional use cases and edge cases.
v3 - Manual testing

Photo by Stijn Swinnen on Unsplash
Now that we have tested the smart contract with unit tests in embedded mode, the next step is to test against a separate chain. For this we will use Ganache, running a single-node chain locally.
Hardhat tasks
To facilitate our smoke testing, we will utilize Hardhat’s task plugin mechanism.
In the v3 branch, under folder tasks, we have created a number of tasks to allow us to emulate the different steps
of the interactions (plus a few more generic ones). For convenience, the mint-related tasks have a numeric prefix to
their name. This way they will appear first in the Hardhat tool list as well as indicate the correct order of invocation.
1
2
3
4
5
6
7
8
9
10
$ npx hardhat
Hardhat version 2.12.2
...
AVAILABLE TASKS:

  1-mint-request    	Triggers a mintRequest for PGBP
  2-get-mint-request	Receive the latest MintRequest message for PGBP
  3-auth-request    	Triggers an authRequest for PGBP, in response to a mintRequest
  4-get-auth-request	Receive the latest AuthRequest message for PGBP
...
You can get help for any task with: npx hardhat help 1-mint-request
The tasks correspond to the interactions back to the original diagram and are created in pairs: one to call the smart
contract method (e.g. mintRequest) and one to receive the event on the other side and decrypt its payload (e.g.
getMintRequest)
Last thing to note is the contract deployment script, under folder deploy.
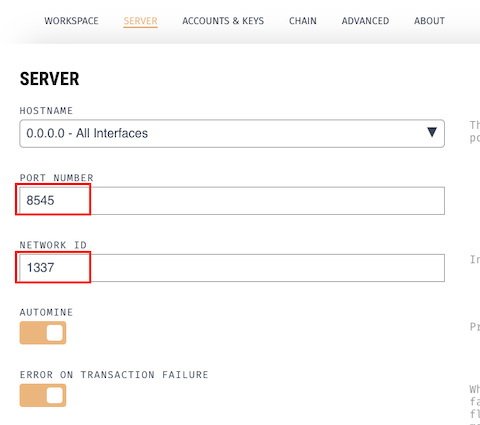
Ganache deployment
Switching to Ganache, we create a new workspace (i.e. chain instance), making sure the settings match our Harhdat config
file.
We pick 2 of the workspace auto-created accounts and take note of their private keys and account address. We will use one
as the smart contract owner (TPP) and one as the Payer (bank account holder).
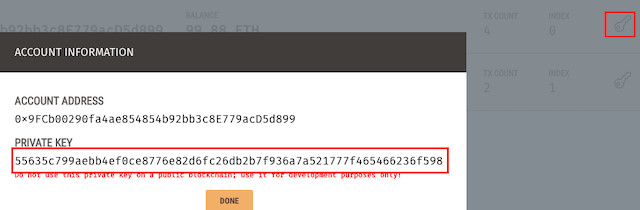
Take a copy of the account private keys; we will use them below prefixed with 0x. I.e. if the Ganache private key is
123abc, we will be using 0x123abc.
With Ganache running, we deploy the smart contract. The tag auto-selects our contract deployment script.
1
2
PRIVATE_KEY=0x<TPP_PRIVATE_KEY> \
npx hardhat deploy --network ganache --tags gbp
We can verify the contract deployment in Ganache.

Take note of the contract address, as we will need it for our…
Local testing
We can now use the tasks we have created to emulate the flow between the 2 accounts: Payer and TPP. We do not have to use any real values at this point, it is all about testing the flow of the deployed contract.
Start by having the user make a mintRequest
1
2
3
4
5
6
7
8
9
PRIVATE_KEY=0x<PAYER_PRIVATE_KEY> \
npx hardhat 1-mint-request \
    --contract <CONTRACT_ADDRESS> \
    --network ganache \
    --amount 100 \
    --institution-id test-bank \
    --sort-code 405060 \
    --account-number 1234567 \
    --name "John Doe"
The TPP’s Ethereum client process needs to receive the message. Since we have not developed it yet, we need to do it
manually.
The getMintRequest action decrypts the event with the PRIVATE_KEY and prints the payload.
1
2
3
4
5
6
7
8
9
10
11
12
13
14
15
PRIVATE_KEY=0x<TPP_PRIVATE_KEY> \
npx hardhat 2-get-mint-request \
    --contract <CONTRACT_ADDRESS> \
    --network ganache \
    --account <PAYER_CHAIN_ACCOUNT>

Listening for MintRequest for PGBP (contract 0x... ) on network ganache
MintRequest received
        RequestId 0xbff95a362c6b6c2577c5a0dd76ac3f645b2fdda2bcacd5c3fc351916a4d44954
...
        Encr. data {"version":"x25519-xsalsa20-poly1305","nonce":"...","ephemPublicKey":"...","ciphertext":"..."}
--------------------------------------------------
MintRequest encr. payload
...
        Public key CgTZFRFIToxlhoxMkexzbhNiTgSkIkqeI2egzp0kHVA=
It is important to note the Payer’s encryption public key. The TPP must use this for all subsequent Payer-bound interactions. We can continue the flow with the other 2 implemented tasks.
Sending the authorisation request from the TPP to the user.
1
2
3
4
5
6
7
8
PRIVATE_KEY=0x<TPP_PRIVATE_KEY> \
npx hardhat 3-auth-request \
    --contract <CONTRACT_ADDRESS> \
    --network ganache \
    --request-id <ORIGINAL_REQUEST_ID> \
    --public-key <PAYER_PUBLIC_KEY_FROM_MINT_REQUEST> \
    --consent-id <SOME_CONSENT_ID> \
    --url "https://bank.com/some-url/to/authorise/consent/"
…and receiving it on the other side.
1
2
3
4
5
PRIVATE_KEY=0x<PAYER_PRIVATE_KEY> \
npx hardhat 4-get-auth-request \
    --contract <CONTRACT_ADDRESS> \
    --network ganache \
    --account <PAYER_CHAIN_ACCOUNT>
Then notify the TPP of the consent authorisation code.
1
2
3
4
5
PRIVATE_KEY=0x<PAYER_PRIVATE_KEY> \
npx hardhat 5-auth-granted \
    --consent-code <SOME_STRING> \
    --contract <CONTRACT_ADDRESS> \
    --request-id <ORIGINAL_REQUEST_ID>
It will be an excellent exercise for the reader to continue implementing the remaining missing tasks: 6-get-auth-granted,
7-payment-complete. Upon succesfully completing a mint request cycle, the total supply will increase (i.e. tokens being
minted). This will be verified with npx hardhat total-supply.
Brief pause - Sandbox bank accounts

Photo by Claudio Schwarz on Unsplash
Since our solution is based on OpenBanking, we need to use a test banking platform. We will go for the Natwest sandbox.
It gives us a realistic client e-banking view, to better visualise the money flows.
A detailed overview of the sandbox and its basic concepts can be found in my hands-on OpenBanking blog post. If you are not familiar, it would be very helpful to take some time to read the basic concepts.
To keep things simple, we will use basic security (username & password) in our configured sandbox application.
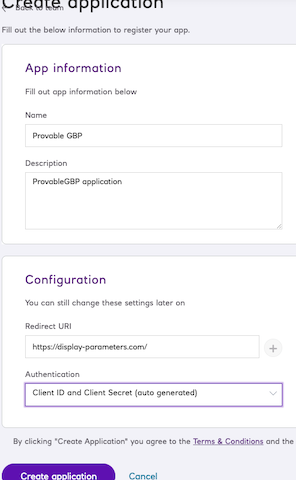
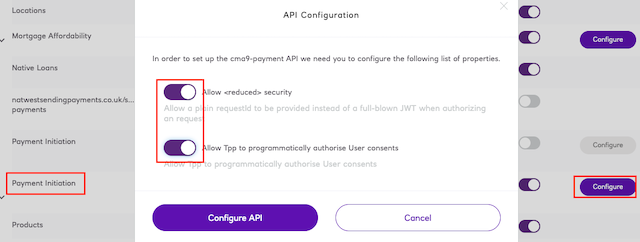
Scroll down to find the Payment Initiation 3.1.7 API and configure it to have reduced security and programmatic
approval. Both of these will make testing easier (but, obviously, are not available in a production environment).
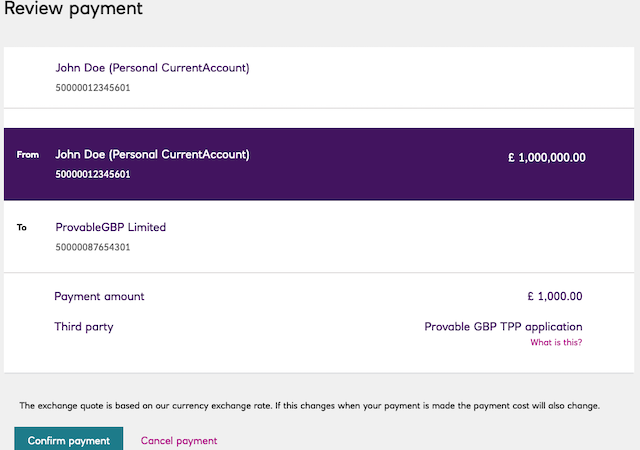
You can use the sandbox’s auto-provisioned data, or you can wipe it out and upload the test data file accompanying this article. The test data contains only 2 users with accounts: John Doe (payer) and Provable GBP Limited (TPP receiver).
At this point you can manually verify the end-to-end setup of the sandbox account or skip to the next section.
The following expanding box contains the cURL commands to manually test the sandbox test application setup by
performing a payment.
Click to expand!
Replace CLIENT_ID & CLIENT_SECRET in the commands below from the newly created sandbox application.
If you have not used the test data of the blog post, you will also need to replace the account numbers and account
holder names.
Client access token
1
2
3
4
5
6
curl -k \
-X POST \
https://ob.sandbox.natwest.com/token \
-H 'Content-Type: application/x-www-form-urlencoded' \
-d 'grant_type=client_credentials&client_id=CLIENT_ID&client_secret=CLIENT_SECRET&scope=payments' \
| jq '.access_token'
Create a consent
Replace the CLIENT_ACCESS_TOKEN below with the value you just got.
1
2
3
4
5
6
7
8
9
10
11
12
13
14
15
16
17
18
19
20
21
22
23
24
25
26
27
28
29
30
31
32
33
34
35
36
37
38
39
40
curl -k \
  -X POST \
  https://ob.sandbox.natwest.com/open-banking/v3.1/pisp/domestic-payment-consents \
  -H 'Authorization: Bearer CLIENT_ACCESS_TOKEN' \
  -H 'Content-Type: application/json' \
  -H 'x-jws-signature: IGNORED_DUE_TO_REDUCED_SECURITY' \
  -H 'x-idempotency-key: SOME_UNIQUE_IDEMPOTENCY_KEY' \
  -d '{
      "Data": {
        "Initiation": {
          "InstructionIdentification": "instr-identification",
          "EndToEndIdentification": "e2e-identification",
          "DebtorAccount": {
            "SchemeName": "SortCodeAccountNumber",
            "Identification": "50000012345601",
            "Name": "John Doe"
          },
          "InstructedAmount": {
            "Amount": "1000",
            "Currency": "GBP"
          },
          "CreditorAccount": {
            "SchemeName": "SortCodeAccountNumber",
            "Identification": "50000087654301",
            "Name": "ProvableGBP Limited"
          },
          "RemittanceInformation": {
            "Unstructured": "Provable GBP mint",
            "Reference": "Provable GBP mint"
          }
        }
      },
      "Risk": {
        "PaymentContextCode": "Services",
        "MerchantCategoryCode": null,
        "MerchantCustomerIdentification": null,
        "DeliveryAddress": null
      }
    }' \
    | jq '.Data.ConsentId'
Generate authorisation URL
Paste the value in the CONSENT_ID below.
REDIRECT_URI is as you have defined it in the sandbox application definition.
1
2
3
4
5
6
7
curl -v -G -k \
  "https://api.sandbox.natwest.com/authorize" \
   --data-urlencode "client_id=CLIENT_ID" \
   --data-urlencode "response_type=code id_token" \
   --data-urlencode "scope=openid payments" \
   --data-urlencode "redirect_uri=REDIRECT_URI" \
   --data-urlencode "request=CONSENT_ID"
Complete authorisation
Copy the location from the response and paste it in a browser.
Complete the consent authorisation, using the login information of John Doe (customerNumber etc)
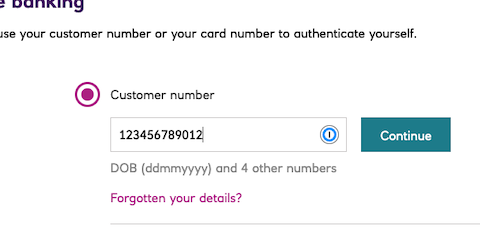
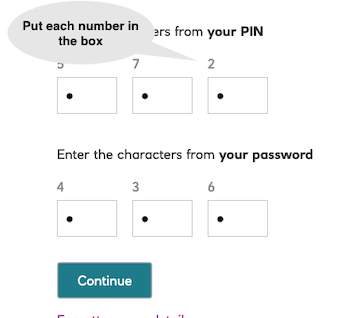
Once complete, copy the code URL parameter.

Exchange code for access token
Replace CLIENT_ID, REDIRECT_URI and AUTH_CODE_FROM_URL as necessary.
1
2
3
4
5
6
curl -G -k \
  -X POST \
  https://ob.sandbox.natwest.com/token \
  -H 'Content-Type: application/x-www-form-urlencoded' \
  -d 'client_id=CLIENT_ID&client_id=CLIENT_SECRET&redirect_uri=REDIRECT_URI&grant_type=authorization_code&code=AUTH_CODE_FROM_URL' \
  | jq '.access_token'
Make the payment
Replace the ACCESS_TOKEN and CONSENT_ID from above.
1
2
3
4
5
6
7
8
9
10
11
12
13
14
15
16
17
18
19
20
21
22
23
24
25
26
27
28
29
30
31
32
33
34
35
36
37
38
39
40
41
curl -k \
  -X POST \
  https://api.sandbox.natwest.com/open-banking/v3.1/pisp/domestic-payments \
  -H 'Authorization: Bearer ACCESS_TOKEN' \
  -H 'Content-Type: application/json' \
  -H 'x-jws-signature: IGNORED_DUE_TO_REDUCED_SECURITY' \
  -H 'x-idempotency-key: SOME_UNIQUE_IDEMPOTENCY_KEY' \
  -d '{
      "Data": {
        "ConsentId": "CONSENT_ID",
        "Initiation": {
          "InstructionIdentification": "instr-identification",
          "EndToEndIdentification": "e2e-identification",
          "DebtorAccount": {
            "SchemeName": "SortCodeAccountNumber",
            "Identification": "50000012345601",
            "Name": "John Doe"
          },
          "InstructedAmount": {
            "Amount": "1000",
            "Currency": "GBP"
          },
          "CreditorAccount": {
            "SchemeName": "SortCodeAccountNumber",
            "Identification": "50000087654301",
            "Name": "ProvableGBP Limited"
          },
          "RemittanceInformation": {
            "Unstructured": "Provable GBP mint",
            "Reference": "Provable GBP mint"
          }
        }
      },
      "Risk": {
        "PaymentContextCode": "Services",
        "MerchantCategoryCode": null,
        "MerchantCustomerIdentification": null,
        "DeliveryAddress": null
      }
    }' \
    | jq '.Data.DomesticPaymentId'
Verify payment settlement (optional)
Replace the PAYMENT_ID and ACCESS_TOKEN from above.
1
2
3
4
curl -G -k \
"https://api.sandbox.natwest.com/open-banking/v3.1/pisp/domestic-payments/PAYMENT_ID" \
-H 'Authorization: Bearer ACCESS_TOKEN' \
| jq '.Data.Status'
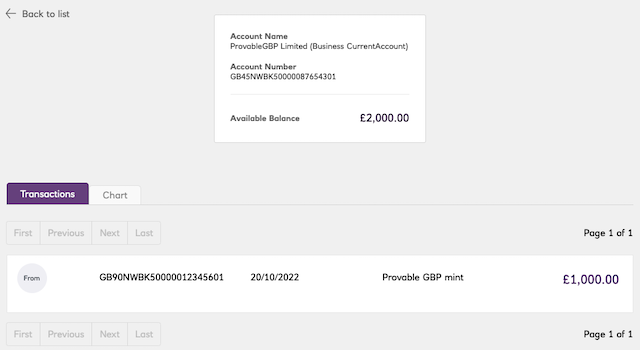
You can also log in to the sandbox E-Banking as “ProvableGBP Limited” (Bankline customer id 1234567890) and verify that
the transaction took place and the business account balance has increased (i.e. we can mint new tokens).
v4 - TPP bank client
With the smart contract fairly well covered, it is time to turn our attention to the TPP’s automated process.
We will implement it in Go.
Create a new sub-folder tpp-client, next to chain to hold our Go code.
1
2
mkdir tpp-client && cd tpp-client
go mod init github.com/sgerogia/hello-stablecoin/tpp-client
For the interactions with the bank’s OpenBanking APIs, we will use the go-resty library.
go get github.com/go-resty/resty/v2
Based on that we create an abstract TPP client interface and a concrete Natwest sandbox implementation.
The end-to-end integration test verifies the correct functionality of the banking client, for the
entire lifecycle.
Note that this version of the test has hard-coded account numbers from our test data set. A better implementation would
be using a test data file.
Also note that we are taking advantage of the programmatic consent approval offered by the Natwest sandbox in lieu
of a real customer approval.
We can run the tests with make test-client.
With the banking interaction done, it is time to move on to…
v5 - Server-side cryptography
What we want to achieve here is identical encryption/decryption behaviour as what the Metamask wallet does internally. See section Encryption discussion further up.
At the core of our code is the Go implementation of the NaCl library. go get golang.org/x/crypto/nacl/box
The internals of it follow the original research.
We will highlight 2 aspects of our code:
-
The
KeyPairabstraction
NaCl is using elliptic curve asymmetric encryption. Ethereum (and most/all chains for that matter) use elliptic curve asymmetric signatures. Ethereum and Nacl utilise different elliptic curves.
So we need to build a mechanism where we can generate 2 public keys from the same private, one for each curve. -
The encrypted message’s (un)marshalling
The encrypted message is a JSON, with base64 encoded fields and known binary lengths. We tap into Go’s JSON mashalling support to encapsulate this.
The unit tests (make test-client) verify the correctness of our encryption, as well as compatibility with an encrypted
message generated manually using Metamask’s implementation.
It is time to move to the “meaty” part of our Go coding.
v6 - Ethereum smart contract client
We are making heavy use of the Ethereum Go implementation. go get github.com/ethereum/go-ethereum
In order to implement the TPP logic we outlined in section Solution, we split the code in 4 packages.
-
Contract and wrapper (
contract)
The fileprovable_gbpis an auto-generated binding from the contract’s ABI. It contains all the available contract methods and corresponding Go data structures. See Makefilegenerate-abitarget.
We created a wrapper around this binding (contract_client), which allows us to interact with the contract on our own terms. The key thing to note here is theGetSingleUseSessionmethod. This makes sure that each contract call uses the next nonce and the correct gas price.
More on this in the Discussion section below. -
Ethereum event handling (
event)
The contract event handler and subscriber are naive implementations of the logic.
The subscriber connects to an event stream from the contract (i.e. requiring a websocket), but has very little in terms of error recovery (e.g. in case of network errors). The handler is more straight-forward in its logic, processing events as the come in. It makes no effort to determine duplicate/repeated events. -
Payment settlement check (
schedule)
The scheduler and its associated task is another simple in-memory component. It is intended to be triggered by an external periodic job and check submitted payments until they are confirmed (i.e. irrevocably executed and not stopped by, e.g. internal fraud checks). -
Binary launch and config (
cmd)
Finally this package provides themainmethod which brings our system together and launches the binary process. It is configured by an external TOML file.
After updating the Makefile env. variables, we can execute all our tests (make test-client), including the
complete end-to-end integration test.
We are finally ready for an…
End-to-end test

Photo by Jeswin Thomas on Unsplash
As before, for our end-to-end test we will be using a different pair of keys: one for the Payer and one for the TPP.
Get an Infura account key and follow the instructions in Annex 1 to have a correctly set up Metamask wallet, pointing to the Sepolia testnet.
We will first deploy our contract.
1
2
3
PRIVATE_KEY=0x<TPP_PRIVATE_KEY> \
INFURA_TOKEN=<INFURA_TOKEN> \
npx hardhat deploy --network sepolia --tags gbp
Note down the new contract address you will see printed; we will need it soon!
Let’s build the Go binary.
1
make build-client
Edit the correct values in tpp-client.toml, like ContractAddress, ProviderUrl,… Pay attention that we will
be using Infura’s websocket API (not HTTP), as we need streaming event notifications.
Run the local server using the private key. Note how we omit the 0x key prefix here.
1
2
3
4
PRIVATE_KEY=<TPP_PRIVATE_KEY> \
  ./tpp --config ./tpp-client.toml
...
{"level":"info","ts":1668771551.527633,"caller":"cmd/main.go:53","msg":"Listening for on-chain events..."}
You can view the entire mint interaction between Payer and TPP in the captioned video below (video has no sound).
The commands issued in the interaction are in the expanding section below, if you are interested.
Click to expand!
Throughout the following, we can track the contract interactions on Sepolia Etherscan; transactions, events and event fields.
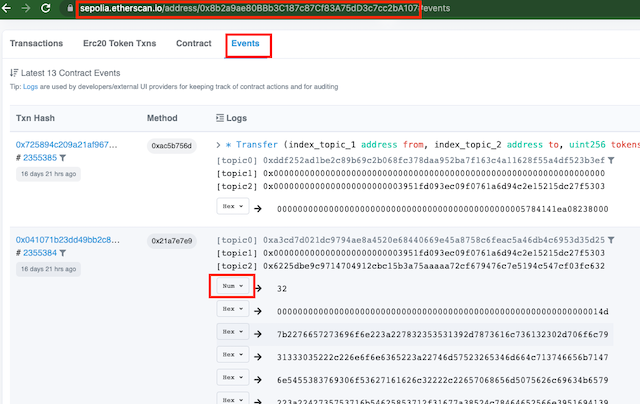
Let’s make a mint request as a payer from the command line. You may need to change the bank account details if you are using a different Natwest sandbox dataset.
1
2
3
4
5
6
7
8
9
10
11
12
INFURA_TOKEN=<INFURA_TOKEN> \
PRIVATE_KEY=0x<PAYER_PRIVATE_KEY> \
npx hardhat 1-mint-request \
--contract <CONTRACT_ADDRESS> \
--network goerli \
--amount 123 \
--institution-id natwest-sandbox \
--sort-code 500000 \
--account-number 12345601 \
--name "John Doe"

Initiating mintRequest for 123 PGBP ...
After a few seconds, we can see the TPP process coming to life, after receiving the event.

The TPP process contacts the bank to create a draft consent and calls the authRequest method of the contract.
While this is happening, we need to have the client command line listening for the emitted AuthRequest event.
1
2
3
4
5
6
7
INFURA_TOKEN=<INFURA_TOKEN> \
PRIVATE_KEY=0x<PAYER_PRIVATE_KEY> \
npx hardhat 4-get-auth-request \
--contract <CONTRACT_ADDRESS> \
--network sepolia \
--account <PAYERS_ACCOUNT_ON_SEPOLIA_USED_FOR_EVENT_FILTERING> \
--poll true
This command will start polling the contract for new AuthRequest events. Once a new one is detected, it will print
its details.
Note the RequestId and use the URL to open the bank’s consent authorisation page.
On approval, we need the authorisation code. We put it in the payload of the authGranted call, along with the RequestId.
1
2
3
4
5
6
7
INFURA_TOKEN=<INFURA_TOKEN> \
PRIVATE_KEY=0x<PAYER_PRIVATE_KEY> \
npx hardhat 5-auth-granted \
--contract <CONTRACT_ADDRESS> \
--network sepolia \
--request-id <REQUEST_ID>
--consent-code <CONSENT_AUTHORISATION_CODE>
The TPP process receives the AuthGranted event, executes the payment. Upon successful settlement of the fiat payment,
it calls the paymentComplete method to mint the tokens in the Payer’s Ethereum account.
And that was it!
We just had an automated ERC-20 mint, in response to a transfer of fiat, all visible on-chain. 🎉🥳🍾
Discussion & Next steps

Photo by charlesdeluvio on Unsplash
The first thing to note about our system is that it is currency-agnostic.
We just need to
- change the ERC-20 token code in the contract (e.g.
PUSD,eRupee), and - connect our backend to a different OpenBanking API, giving us access to payments in a different fiat currency.
This is the benefit of introducing standardized API abstractions (like OpenBanking), over disparate underlying resources (like payment rails).
On the other hand, this implementation and approach is by no means perfect. It has a number of issues, which would need correction or mitigation before considered anywhere near mature. Here is a non-exhaustive list.
Product-related
- The Payer needs to have the native token (e.g. ETH) to interact with the contract.
This could be a barrier-to-entry, especially if this was considered a mass-market on-ramp. A possible future solution could be a gas relay, where some other party picks up the cost of the transaction. - Metamask will deprecate the encryption methods
Removal of these methods without a direct replacement would make it close to impossible to implement our system over EVM-compatible chains. A derisking strategy could be to choose a privacy-first chain, like Secret. - The contract is subject to spam.
A bad actor could start spamming the contract with pointlessmintRequestcalls from burner addresses, especially if calls were “free” due to gas relay. A possible mitigation to that could be to require some additional verifiable form of identity in the payload (e.g. Google identity JWT) and move some filtering/decoding logic in the smart contract (increasing the gas cost). - A malicious TPP could fake mint interactions.
Either by faking the transactions or by using “money mule” bank accounts with recycled funds. This would be the harder one to crack, while maintaining a balance between transparency (of interactions) and privacy (of user details). Some avenues to explore would be- TLS notarised bank responses
- publishing automated OpenBanking Balances for TPP’s account on-chain (e.g. via Oracles) and cross-referencing with completed mint transactions.
Technical
- We have not used a proxy contract.
This is a standard architectural pattern to ensure transparent upgradeability of our logic. I have omitted it here for brevity and clarity. - The
authGrantedmethod is redundant.
We could have reduced the number of interactions by redirecting from the bank back to a callback URL exposed by the TPP process. This would have picked up and used the authorisationcode. This would reduce the surface area for network errors by reducing interactions. It would also reduce the transparency of our protocol, as there would not be an on-chain interaction that the Payer completed the authorisation. - The current implementation has very little fault tolerance.
Everything is kept in memory and error correction is an afterthought. As one would expect with a PoC. - The current implementation has very poor parallelization.
Sending Ethereum tranactions is inherently sequential, due to the account’s nonce. The current code to mitigate this (GetSingleUseSession) is not well thought-out. The parallelization problem would be best addressed with a combination of- a persistent message bus, deduplicating incoming messages on the TPP side, and
- multiple outgoing TPP wallet addresses, akin to outboxes.
Last but not least, the curent PoC lacks a UI; a single-page application to integrate with Metasmask and provide a semi-realistic user experience.
The motivated reader could take this PoC one step further by adding a web-based UI, using the existing Hardhat code as an example.
Parting thought

Photo by Ian Schneider on Unsplash
Web3 applications and systems pose their own opportunities as well as challenges.
Striking the right balance between usage requirements and what is available by the underlying platforms is key.
When done right, it can result in applications that can scale globally instantly.
I hope this blog post gave you an initial direction of
- how to approach similar problems, and
- which tools to reach for.
Keep building!
Footnotes
- In true narrow bank form, part of USDT/C’s revenue stream is arbitraging between offering zero yield (for depositors) and receiving interest from converting USD balances into interest-bearing instruments (e.g. bonds)
- One example is bank account details which is PII and could be used in banking fraud. Another
example is customer consent authorisation links and consent authorisation tokens.
Though not explicitly documented, in most banks’ case these are single use. If unencrypted, a malicious actor could intercept them, make a failed attempt just to “consume” them and invalidate an otherwise valid customer flow. - Even though there are no vulnerabilities, these methods are marked as deprecated. That is something to keep in mind in this approach.
- All blockchains make account public keys visible/retrievable for signature verification. However, even though originating from the same private key, the public encryption key will be different as it is derived from a different elliptic curve (e.g. ECDSA for Ethereum).
Annex 1: Installing Metamask, connecting to Sepolia, using faucets, etc
HERE BE DRAGONS!! 🐉🐉
Be extremely careful, which network you are connected to AT ALL TIMES when in test/development. Sending mainnet ETH to a testnet address will result in loss of funds.
This short guide assumes you are starting from scratch.
If you already have Metamask installed, then you can just skip to the relevant parts.
Let’s start by installing the Metamask browser extension from the official website.
-
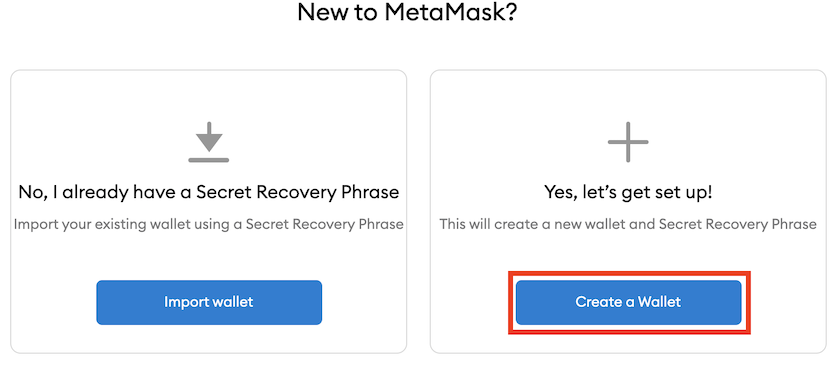
It launches a setup wizard. Create a new wallet.
-
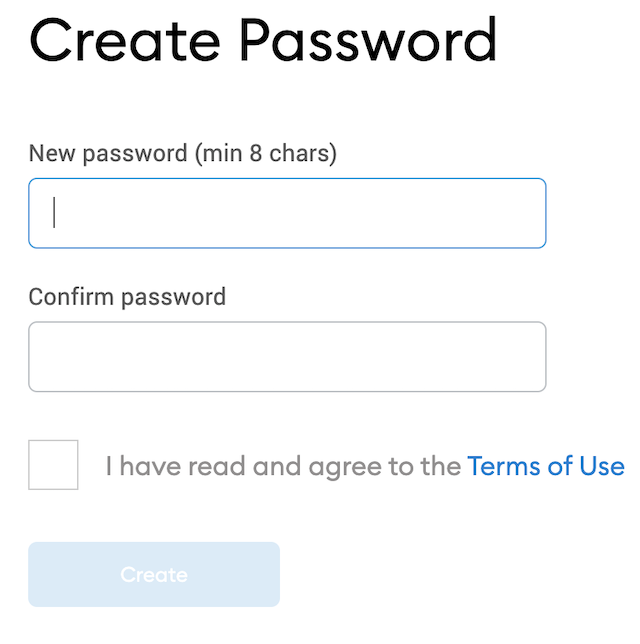
Your local wallet will be password-protected. Select a password.
-
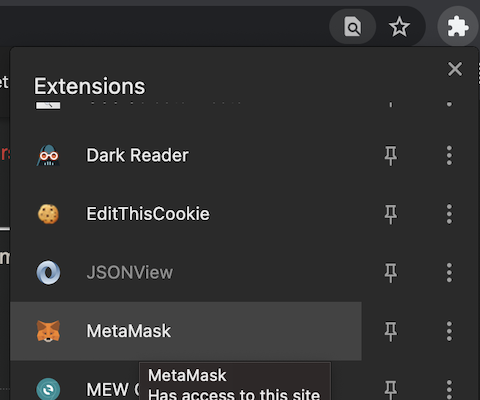
Metamask is now installed in your browser’s extensions panel.
-
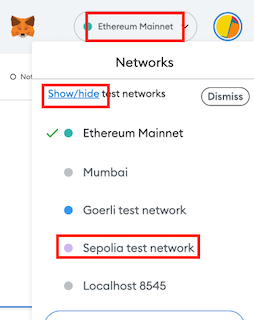
Select the Sepolia network from the drop-down.
If you cannot see Sepolia, you may need to toggle showing more networks.
-
Next up is funding our Metamask with testnet ETH.
Select one of the Sepolia faucets and use your Metamask account address to receive.
-
We will use 2 accounts from the same wallet, pretending we are different actors.
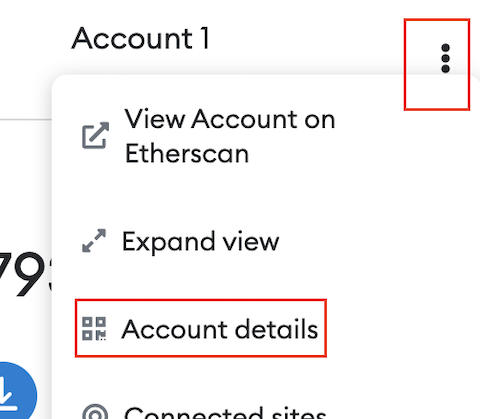
Go to theAccount Detailsof the default Metamask account. Click the pencil and rename toTPPso we know what is what.
-
Finally, create a 2nd account. We will use it as the owner of the Oracle consumer contract.
Name the account asPayeror similar.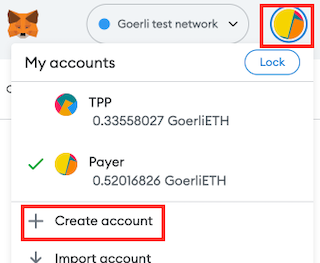
You can transfer some GoerliETH between the 2 accounts, or fund directly from a faucet. -
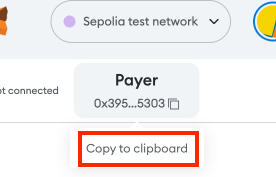
To view an account’s private key (used for interacting with the contracts), we go to their details.
Then we choose toExport.
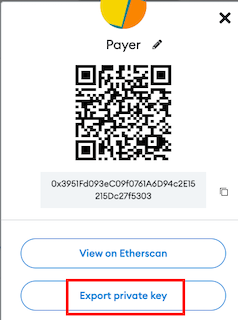
Export the keys for bothTPPandPayer. -
Check your balance on both accounts; we are all set for testing.

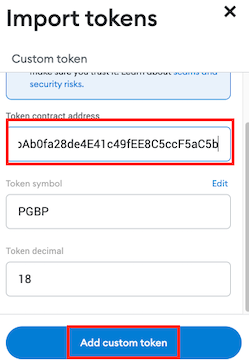
-
Once the
ProvableGBPcontract is deployed to Sepolia, we will need to make Metamask aware of the new token to track its balance. Click on thePayeraccount and add the address of your contract (linkImport token).